Monday, October 25, 2010

Halloween Centerpiece!

Fantabulous Cricut has a challenge this week that I couldn't resist.  I like to make fun centerpieces that can function in some other way. It usually ends up being a centerpiece that doubles as a candy holder!  Here is the halloween centerpiece/candy holder that I created.  The base is a treat box that I bought on clearance at Michaels.  I used orange tissue paper to line it.  Then....


I added candy corn!  Candy corn is my big cupe's (hubby) favorite halloween treat.  So I thought I'd make a cute display for it!  All the cuts are from the Paper Doll Dress Up cartridge.  I love everything about this cart! 

Here is the bat:


the pumpkin:


the ghost:


and the tree:


I made two of every cut and then attached each them to each side of a Halloween pencil (bought a package of them at Target in the dollar section).   I wrapped the bottom of the pencils in saran wrap before I added them to the candy because I wasn't sure if it would be safe to have them touching the candy or not!
Here it is all finished:


I think Big Cupe is gonna love it!  Hehe..a bonus..I don't have to worry about Little Cupe getting into the candy because she tried a piece and promptly voice her opinion on candy corn!  She spit it out and said "YUCKY"!  She then spent quite a bit of time telling me that it wasn't candy because it didn't taste good!

Wednesday, October 13, 2010

Halloween Card!

Another Pink Stamper challenge!! The challenge is to make a Halloween or Fall project.  Since I still need to make some cards, it's perfect!  I decided to make a pumpkin card using the pumpkin on the Paper Doll Dress-up cartridge. 


I decided to make a pumpkin card using the pumpkin on the Paper Doll Dress-up cartridge.  I thought it was a pretty cute cut, but not so cute that my 3.5 year old nephew wouldn't like it!


I cut out the pumpkin out with orange cardstock and again with green.  I cut off the vine and stem from the green and glued it on the orange pumpkin.  I glued yellow on the back so the eyes would glow and then I used a gel pen to draw on the lines and eyes.  I adhered the pumpkin to the card using pop dots.  I really like using pop dots because it really does give the card a more finished look because of the dimension. 


I used the Boo To You embossing folder by Provo Craft to emboss the purple cardstock. Cute!!


 I added a little ghost to the inside of the card.  The ghost is a cut from the Paper Doll Dress-Up cartridge too.  I really like that the cart has so many different cuts, not just paper dolls and clothes! It has a lot of extras. 


The ribbon on the bottom of the card is the same ribbon I used on the Hello Kitty halloween card on my previous post.  It's Celebrate It! from Michaels.  Enjoy!!

Tuesday, October 12, 2010

Cute Halloween Card!

The Pink Stamper is having a challenge/giveaway today!  The challenge is to create something cute.  I made this card, which I think is super cute!!


How much cuter can it get?  Hello Kitty is the absolute cutest!  I used the Hello Kitty greetings cart and just some scrap cardstock.  The candy corn paper is K & Company.  The ribbon is Celebrate It! from Michaels.
Here is a closer look at Hello Kitty:


 It's kind of hard to tell but I cut her out in orange and put that in the back of the black Hello Kitty cutout.  I adhered her with pop dots so that you would be able to see the orange and she'd be more dimensional.
 Hope you enjoy it!!

Wednesday, September 8, 2010

First day of school!

My niece (I know I have been talking about her a lot lately!) starts Kindergarten this week! Since I don't live near her I wanted to send her a card to wish her well on her first day and to just let her know I am thinking about her.  I was actually working on another project when the idea for this card came to me so I just whipped it together!  It's a simple, simple, simple card!


The card is cut at A2, 5 1/2" by 8 1/2".  It's 5 1/2" by 4 1/4" when folded. I just realized as I was typing that I make A LOT of cards that open up instead of sideways.  Anyway, the apple is cut at 4 1/4" using the Create-a-Critter cart which is such an awesome cartridge.  I used regular plain cardstock for the apple and the card.  The printed paper is just some school-themed paper that I had laying around and thought it would be perfect for this!


I didn't want to leave the inside of the card plain so I made a little apple for the inside.  The apple is cut at 2".  It is cut using the shadow button so there isn't a face on it.  Now all it needs is some well-wishes for my sweet niece and I will send it off!

Wednesday, September 1, 2010

Dragon!

Sorry for the lack of posts in the past few weeks.  We have been doing some traveling and projects around our house and have just been busy, busy, busy!  This card is for a boy, my sweet medium cupe!  He is starting school so I wanted to make him something to mark the occasion. 


It's simple and boyish, which is what I wanted!  I used textured cardstock for the dragon.  The dragon was cut using the Dress-up Paper Dolls cart, it's cut at 4".  I used stickles and glossy accents to give him some texture! 
The card itself is cut at 6 1/4 x 9 1/4 and folded.  The red paper is cut at 4 1/4 x 5 1/2.  The blue paper is textured using the Diamonds in the Rough embossing folder (cuttlebug) and cut at 4 x 5.  I used ribbon from the dollar section at Target to give it a bit more color.


I also used pop-dots so that the dragon was raised for more dimension!  Inside it is lined with red cardstock!

I hope you enjoy!!

Thursday, August 12, 2010

Turning 5!

My niece is turning 5 years old this month!  I can't believe it, it seems like just yesterday we were waiting for her arrival!  She's starting school this year and everything!  I was looking at different cartridges to see what I wanted to make for her birthday card and I chose this one because it had 5 balloons on it!


The card is 7 x 5 (folded). The cut is from the Hello Kitty Greeting cricut cartridge.  It's cut at 5 3/4".  The purple cardstock is embossed with the "With Gratitude" Cuttlebug embossing folder. In order to emboss the entire paper I put it on the paper sideways and ran it through my Cuttlebug and then lined it up on the remaining paper and ran it through again! It worked pretty well.  The ribbon is from the dollar bin at Target.


I used Glossy Accents on the balloons to make them shiny.  They are very shiny! It's kind of hard to tell in the picture though. The "5" is cut from the Hello Kitty Fonts cartridge.  Hello Kitty's dress and bow also have Glossy Accents to make them shiny, it didn't show up in the pictures though.

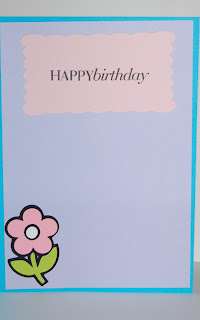
I cut a tag out from George and stamped Happy Birthday on it.  I know that the lavender paper looks crooked, but it really isn't! I wish I knew what I do to make it look like that. It happens so often when I'm taking pictures (sigh!).  The flower is cut at 1 3/4".

The card is done, now I just have to find the perfect gift for her!!  


Wednesday, August 4, 2010

Yummy Cherries!

I have been wanting to make a cherry card for a while. I had this cute cherry print paper and I love it! I grew up in Michigan and I love Michigan cherries! They are soooo delicious!  Traverse City, Michigan has the National Cherry Festival every year in July. There are delicious cherry products in various shops there too!  Dried cherries are a must in my household. My DH (big cupe) loves them, I make him cherry muffins and he also eats them in his cereal.  My little cupe likes them too, she thinks they are candy. Okay, enough about that, on to the card!

The cut is from the Hello Kitty Greetings Cricut cartridge.  It's cut at 3 3/4".  The cherry paper is from Dream Street Papers LLC (isn't it so cute?!).  The card base is dark brown cardstock.  I used textured cardstock for all the cuts, I really like textured cardstock!  I used pop dots on the cherries so they would have some dimension:


I lined the inside of the card with white cardstock but it still needed something so I made some little cherries and I think it made it so much better!


Thank you so much for stopping by to check out my blog!!

Thursday, July 29, 2010

Treat Bags!

I'm going to visit my niece and nephew this weekend and I wanted to bring them a little treat.  Apparently, Silly Bandz are very popular right now so I thought I'd bring them some.  Since Fantabulous Cricut's Challenge Me Monday is Zoo Animals, I thought I'd use that as a theme for some treat bags for them!  Here is what I came up with:


The hippo and lion are cut at 5 1/2" using the Create-a-Critter cartridge.  I used paper from DCWV Animal Crackers stack.  It's cut at 6 3/4" wide and 4" long and then folded in half.  I stapled the printed cardstock to snack-sized ziplock bags with the treats inside.  I used ribbon wrapped around to cover the staples.

Here's the lion:

and the hippo:

I think my niece and nephew will really like these!

Thursday, July 22, 2010

Pagoda Card

Sorry it took so late for me to post this week! Here is a quick, simple card that I made using the Pagoda Cartridge.  I have had this cart for a while but haven't used it! It has many beautiful cuts on it.  I actually bought the cart because I lived in Japan and I thought it would be great for scrapbooking my time there. It actually is versatile though, as you can see from my card!


The card is 5 1/2 x 4/14 (unfolded it is 5 1/2 x 8 1/2), an A2 sized card.  The branches are cut at 4 1/2 and the bird is cut at 2 1/2.  I used pop dots to adhere the bird.


I chose the colors because I wanted to make a card that would be for a guy instead of the trend of girl cards I have been making! I really love the green color, they remind me of the color of the wallpaper in the house I lived in for a while when I lived in Japan.

I hope everyone has a great weekend!!

Wednesday, July 14, 2010

Sweet Treat!

I am participating in another Fantabulous Cricut challenge!  Challenge #18 is to create a yummy treat and making a shape card is optional.  I had this idea to make a shape card that was accordion-style for a while so I decided to try it.  I used the doodlecharms cart and my gypsy and got to work! 
 

I used textured cardstock for the ice cream and plain cardstock for the cherry and the cone.  I used glossy accents on the cherries to make them shiny.  The picture doesn't do them justice at all! They really are so cute.  I added a little white layer of ice cream on the bottoms of the colored ice cream and on both white parts (top of ice cream and bottom) I added some diamond stickles.

Here are some close-ups:


For the cone I wanted to add some texture so I used my Sizzix Dots and Diamonds embossing folder. I apologize for the picture, it's really grainy and I'm not sure why that happened!


Here is a picture of the card closed:


I think I may add a cute little saying on the inside and send it to my Grandma from my Little Cupe! When we visit my Grandma she makes Little Cupe ice cream cones every single day! I love seeing the two of them spend time together, it's very special!

Thursday, July 8, 2010

Little Bug

Fantabulous Cricut's challenge me Monday is to create something with a bug and using the color orange! I really love doing their challenges! I have to say that my projects are usually pretty simple and I am usually awed by the other submissions, but I have fun just coming up with something new!  For the challenge this week I used the Create-a-Critter cartridge and used the ladybug cut...so cute!


The leaf is from the Stretch your Imagination cartridge.  I used my Gypsy to weld two leaves together to make a card.  The dimension of them both is 9.30 wide by 6.29 height.  I used a textured cardstock that was green on one side and yellow on the other side.  For the bug I used dark red and orange.  I used some ink to give the card and bug a bit of a distressed look so it would look "naturey".

Here is a close-up of the bug:


I used pop-dots to adhere it to the leaf.  What do you think?  Is it too simple? 

Saturday, July 3, 2010

Soo Big!

Hi all! I wanted to share a new card I made using the Paisley cartridge.  This cartridge is so cute, I really like the variety on it.


 This is an A7 size card (folded it is a 7" x 5" card). The giraffe is cut from the Paisley cartridge. It's cut at 3 inches. The giraffe actually had leaves in it's mouth but I cut that off.  I also added some hooves to the giraffe's feet! I used glossy accents on the pink parts (the mouth, tail, antlers and flowers) to make them pop a bit. I attached the giraffe to the card using Pop Dots to give it more dimension.


I used the Pooh Fonts cartridge for "Soo Big". I cut it at 3/4".  I used glossy accents on the letters to make them pop and coordinate with the giraffe. 
The flower cardstock is from the DCWV Pocket Full of Posies matstack and the ribbon is from the dollar section at Target. I used the EK Success Scalloped Diamond Edger Punch on the flower cardstock.
I love the bright colors against the brown! I hope everyone is having a great weekend!

Wednesday, June 30, 2010

Pink Stamper Challenge

Today the Pink Stamper posted a challenge using the colors pink, green, orange and brown.  I thought the colors sounded interesting and challenging so I got started!  After quite a while I finally came up with this:


The card base is a 5 1/4" x 5 1/4" square.  I used the Spots and Dots Cuttlebug folder to emboss the green paper.  I also used an EK Success punch on the bottom edge of the green paper.  

The monkey is from the Cricut Lite cartridge, B is for Boy.  It is cut at 3 inches. 


It's a sock monkey! I couldn't wait to use this for something but I didn't have any ideas until the challenge today! It is so cute! 
Here is a close-up of the dot paper:


You can see a little bit better that it has green, orange, pink and brown in it.  I had a lot of fun doing this card. I hope you enjoy it!

Independence Day Project

Fantabulous Cricut's Challenge Me Monday Project #16 is to design something Independence Day themed with a star shape.  This was the perfect challenge for me to work on because I needed to make a centerpiece for the 4th so the challenge gave me inspiration!! 


For this project, I used the Simply Sweet cartridge for all the stars.  I used my Gypsy to cut them at 4.66 x 3.71.  The star print paper is from DCWV (I think!) and the red and blue paper is  The Paper Company.  I used pop dots to adhere the little stars to the big stars for dimension!


The 4th of July is cut from the Independence Day seasonal cartridge.  I used my gypsy to cut it at 5.87 x 5.71.  I cut it out twice, using red paper and blue paper. I wanted everything to be more colorful so I cut out "of" and "July" from the blue paper and glued it to the red 4th of July cut out. 

The little bucket is from the dollar section at Target.  The sticks that each star is attached to are actually pencils that I found in the dollar section at Target, as well!  I filled the bucket with floral foam and stuck the pencils in and then I filled the bucket with scraps of paper that I cut up and crimped using my Fiskars crimper.

I hope everyone has a great holiday weekend!! Enjoy!

Friday, June 25, 2010

Love You!

This is the first project I made using a Cricut Lite cartridge.  I used the Sugar and Spice cart.  This cart has a lot more than just girly cuts, I really love the versatility of the cart!  The cuts are very basic but that's okay...I just did some extra layering.


I cut the birds at 3" using light blue textured paper.  I cut the birds again using light green paper, then I just cut off the birds.  The beaks, words and little heart in the O's are TINY! They were very hard to work with!

The card base is cut at A2 (small regular 5 1/2" x 4 1/4").  I used white cardstock for the base.  The first layer is the same dark brown as the beak and little base on the birds. The pink layer is embossed using the Cuttlebug D'vine Swirl folder.  I used Celebrate It, Basic Narrows ribbon. I love this particular ribbon, it reminds me of cherry blossoms in Japan (I used to live there). 

After using this cartridge I can't wait to try the other Cricut Lite cartridge I have, B is for Boy!

Wednesday, June 23, 2010

Cricut Lite

I just bought my first two Cricut Lite cartridges and I am so excited! I bought B is for Boy and Sugar and Spice. There were so many I wanted but I really liked these the best so I got these two first! I can't wait to make something with them. I will be sharing some new projects with you very soon!!

Friday, June 18, 2010

Father's Day Card

Here is a card I made for my Little Cupe to give to her Daddy! My Big Cupe (hubby) and I call my sweet little girl "Lowly Worm", the character from Richard Scarry.  She got this nickname because she had started to hop around all the time and it just reminded us of Lowly worm and how he hops around because he only has one foot!  The name stuck and now Little Cupe usually gets called some variation of Lowly Worm (low, lowly, lowlys, etc).  She has other nicknames too, which I am sure will come up in future posts!  Anyway, here is the card I made.
The card is A6 size.  All the paper I used is The Paper Company, I don't know which pack (sorry!) they came from.  The blue paper is textured with a Sizzix embossing folder called Dots and Diamonds.  The ribbon is from the dollar section at Target!


The worm (really a caterpillar, but I don't think Big Cupe will notice!) is from the Create-a-Critter cartridge (I really have been using this cart A LOT!). It's cut at 3 3/4".


I used my laser printer to print the wording from the front and inside of the card on the cardstock. I don't know if anyone is really interested in the font I used but it's Segoe Print.

I don't know if Little Cupe is going to give this card to Big Cupe, she saw it and declared that it was hers!

Wednesday, June 16, 2010

BBTB2 Fish Project

Bitten By The Bug 2 has a new project, which is to use the jumping fish from the Camping Out cartridge.  I don't have that cartridge so I used a different fish to make a card.  It just so happens that my Big Cupe's (hubby) cousin's daughter is having her second birthday party this coming weekend and her theme is Finding Nemo! Since there isn't a Finding Nemo Cartridge I just thought a cute fish would make a great card for her!


I used Wausau Paper Creative Collection, Classics Cardstock, for the fish. I don't recall the brand of paper for the turquoise and the white cardstock.  The paper colors of the fish are Galaxy Gold for the tail and fins, Orbit Orange for the body, and Goldenrod for the face. The fish is cut at 2 1/2", it is from the Create-a-Critter cartridge (I love this cart so much!!).  

The ribbon is Celebrate It, Dashes, Dots and Checks, it was on sale for $1 at Michael's this week.. The card is 5 1/2 by 4 1/4 (A2).  I used the Tiny Bubbles Cuttlebug Embossing Folder to emboss the turquoise paper.


I used Pop Dots to adhere the fish to the card, it gives it much more dimension!  I think it turned out perfect for a 2 year old's birthday! Hope you enjoy it too!

Tuesday, June 8, 2010

Moosing Around

Father's Day is still weeks away but I have been motivated to finish up my cards for Father's Day! Here's a card I made for my FIL. I wanted to make him a card with an outdoor theme because he loves the outdoors. We both also have an affection for Meese (that's plural for Moose! Hmmm...it's not? You're joking, right?!) so a single Moose it is!


I used dark green cardstock for the card and dark tan textured cardstock for the layer. The card size is A6.  I used the cuttlebug embossing folder "Forest Branches" to give it some extra dimension!


The moose is made with textured brown cardstock  and the antlers and shadow are made with regular cardstock from The Paper Company.  For the moose I used the Animal Kingdom cartridge cut at 3".  Simple and manly, yet very cute!!